Congratulations to my nephew, Austin and his gorgeous wife Domi! We just got back from Alaska where we attended their wedding. Their rehearsal dinner was Texas themed since Austin is originally from Texas. We brought some of my hubby’s BBQ brisket, Polish wedding sausage and I made tons of pinto beans, potato salad and cole slaw. It was fun introducing Alaskans to Texas BBQ! In addition, I made some pecan tassies that are always a hit and a whole bunch of Texas cookies for the occasion.

I used my favorite vanilla cut out sugar cookies and a new chocolate cut out cookie recipe I found online that was a hit with chocolate lovers. Decorated them all with a double batch of royal icing for 50 cookies.

Chocolate Cut Out Cookies
Ingredients
- 1 cup butter* softened
- 1/2 cup shortening
- 1 1/2 cups sugar
- 2 large eggs
- 1 tsp vanilla
- 3/4 tsp baking powder
- 2/3 cup unsweetened cocoa powder
- 3 1/2 cups flour
Instructions
-
Preheat oven to 350 degrees. In a large mixing bowl, cream together butter, shortening and sugar. Add eggs and vanilla.
-
In a separate bowl, combine the dry ingredients (flour, cocoa powder and baking powder). Slowly, add the dry ingredients to the butter/egg mixture.
-
Roll out dough to about 1/4 inch on floured surface and cut into shapes. Place on a lined cookie sheet using parchment paper or silicone pad. Freeze cookies on the sheet pan for about 5 minutes prior to baking. (This helps prevent spreading.) Bake for 8-10 minutes depending on size of cookie.
Recipe Notes
*If using unsalted butter, add about 1 teaspoon of salt to the recipe.

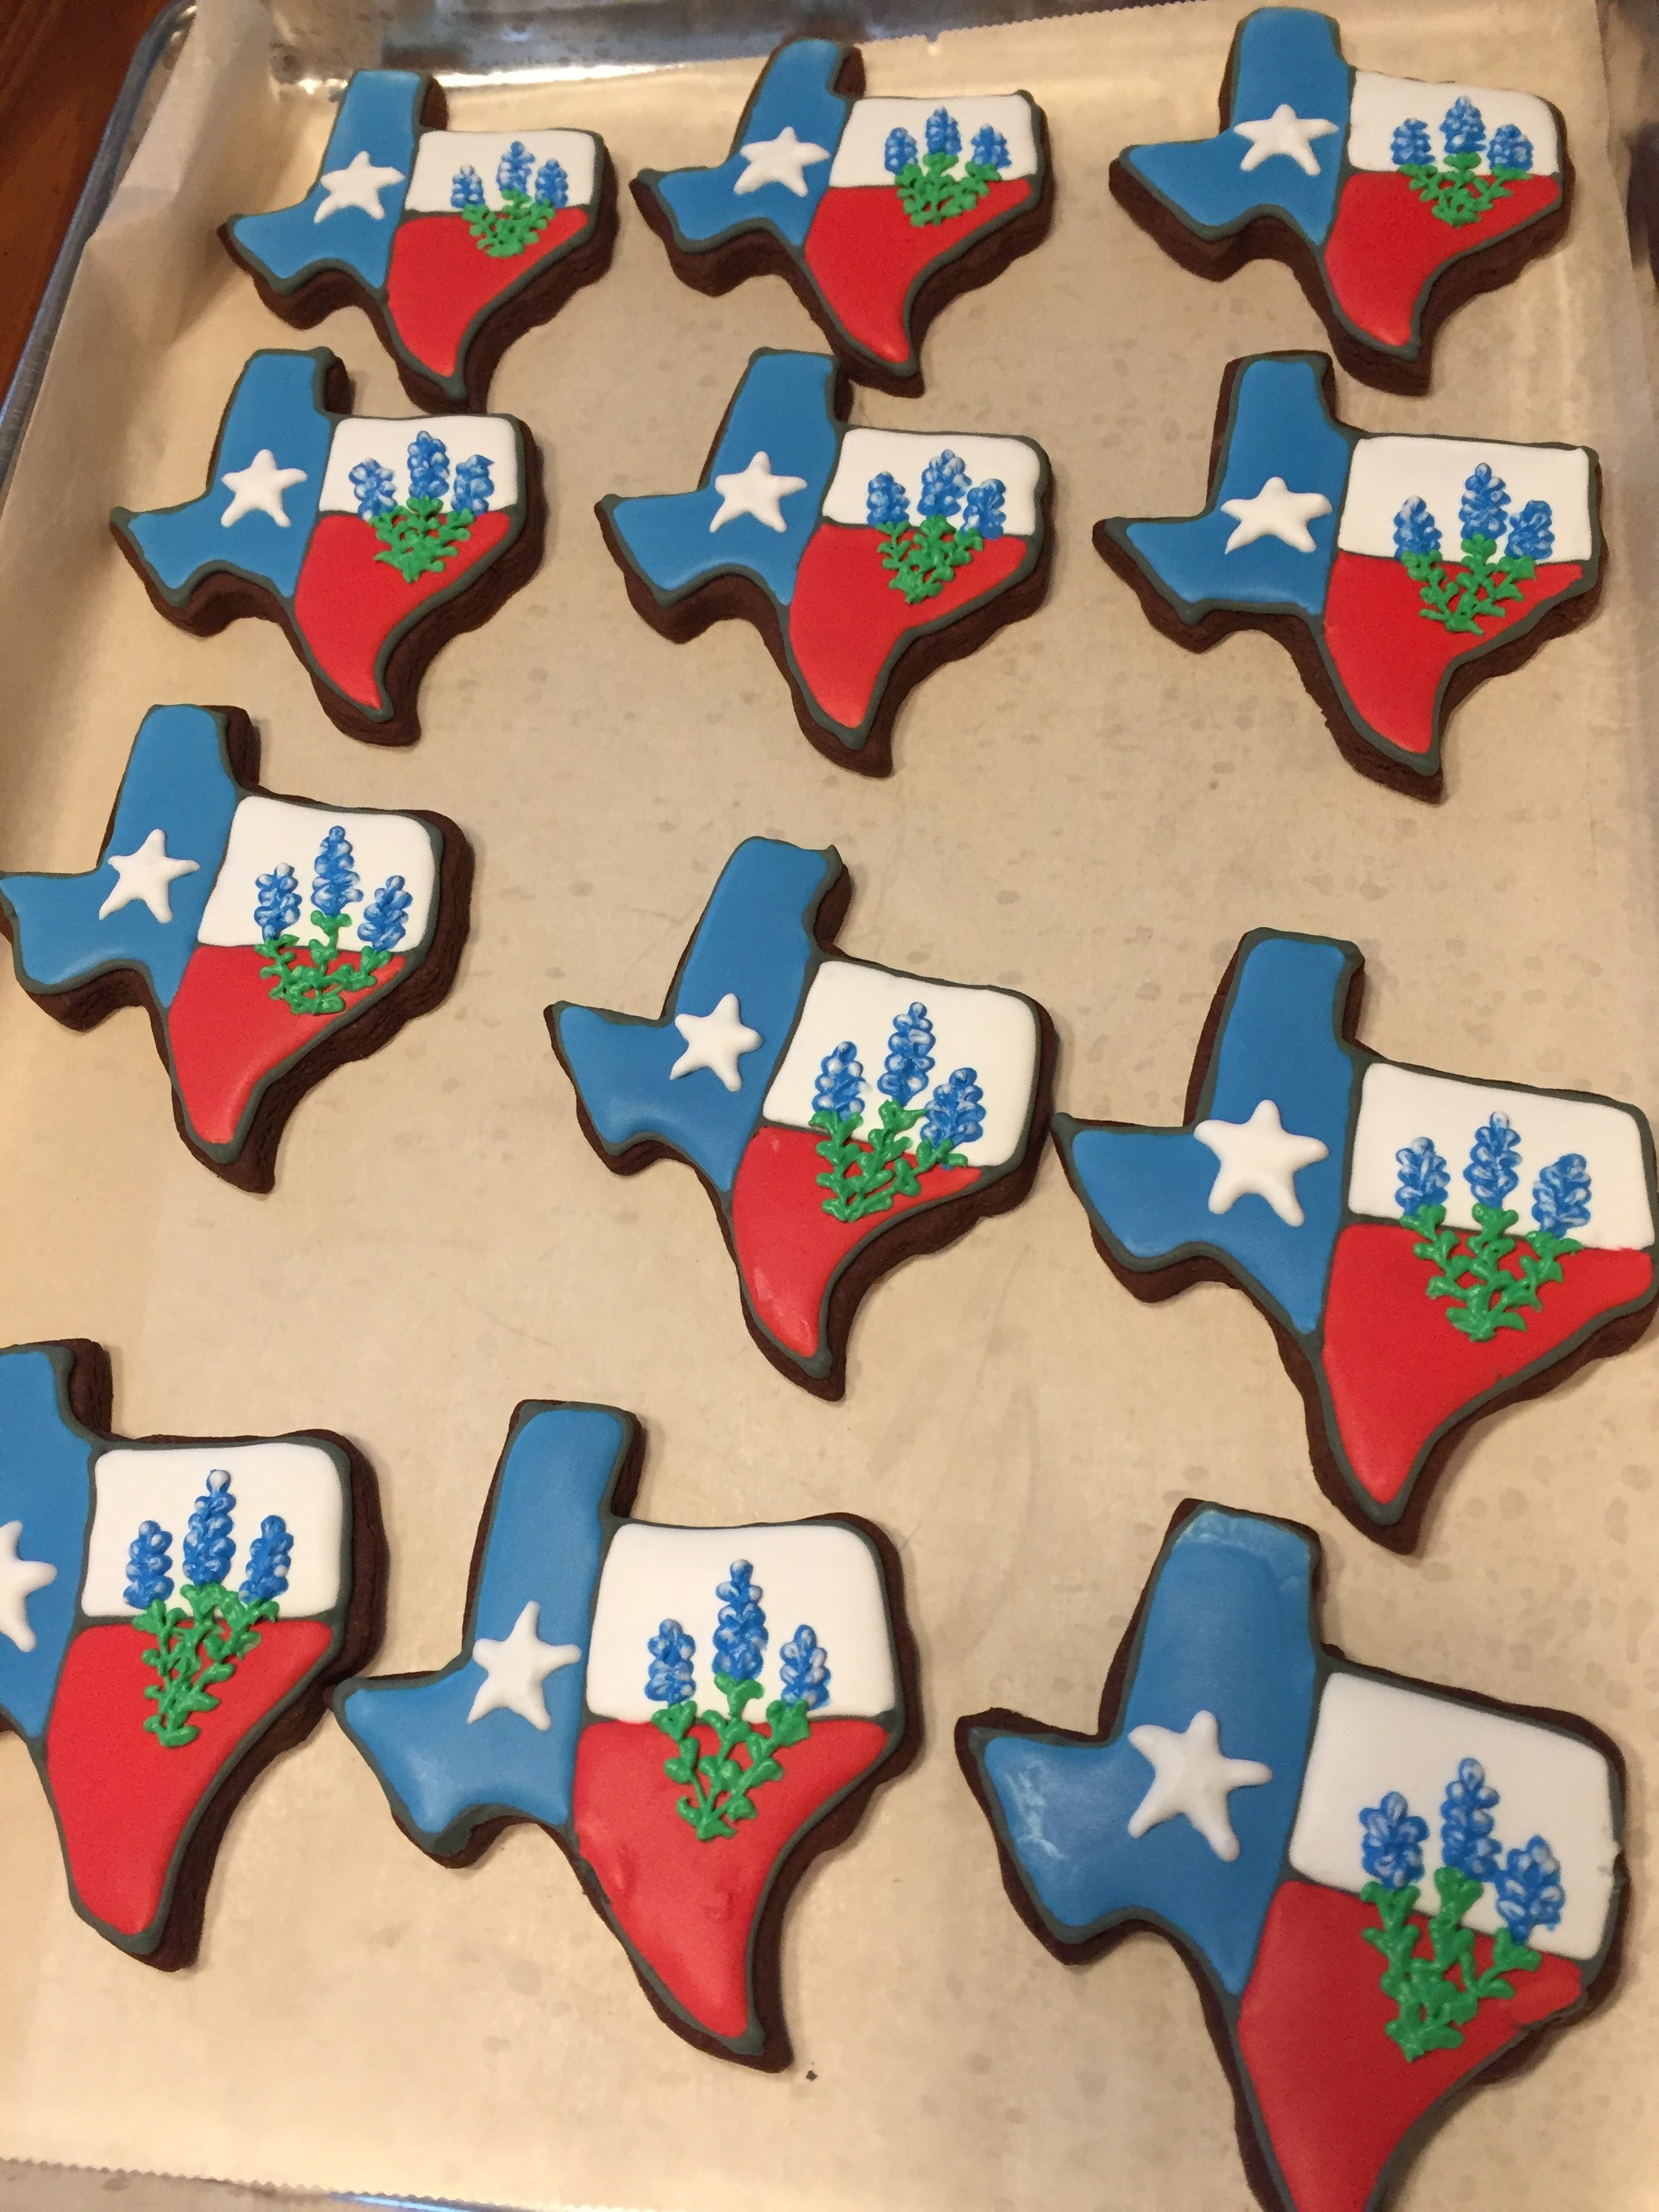
To start, I outlined the cookies and divided them into three sections to resemble the Texas flag.

Next, make three separate colors of flood icing (red, white and blue). Remember, flood icing is royal icing with a little extra water added to it so the consistency “floods” the area you are coloring.
To make flood icing, use only about a teaspoon of water at a time to thin the royal icing. To reach the desired consistency, drizzle the icing from a spoon back into the bowl. The consistency of the icing should disappear into itself after about 5 seconds. You will use several teaspoons of water but only add a teaspoon at a time and mix well after each addition. Once you have it to desired consistency, allow the icing to sit so bubbles surface to the top. Then fill your plastic bottles or pastry bags. (If I make a lot of cookies using the same color, I find it easier to use bottles, otherwise I use pastry bags.)

Then you add the blue to each cookie.

And then the white. I placed a fan near the table I was working at to help the cookies dry. After about an hour or so, I piped the star using a #1 tip and a medium consistency icing. Medium consistency means it was thinned out using water but not as thin as flood icing. You want it to hold it’s shape but not show your piping lines.
This may be a good time to mention, that the key to cookie decorating is icing consistency and it is very hard to explain. It truly is a matter of trial and error.

So, after I decorated the cookies, I started playing with leftover royal icing and a paper plate. After several attempts, I made a bluebonnet by using a #2 tip in blue icing (not thinned) and a #1 tip in white (medium consistency like I used for the stars). I always practice on a paper plate when doing something new. I had never made a bluebonnet before. You may also notice, I was playing with icing consistency and tip size with the white dots. It truly is a trial and error process.

Finally, add little green stems and leaves. The bluebonnets took some extra time but turned out very well.

For travel, I individually wrapped every cookie with a bit of brown kraft paper. I only used the kraft paper because I froze the decorated cookies and thought the paper would help absorb any moisture while defrosting. Sometimes when you freeze decorated cookies, the moisture can discolor your cookies a bit. Usually, when individually wrapping cookies, I don’t bother adding the paper. I will post soon about the packing and traveling with decorated cookies. They made it all the way to Alaska from Texas without one casualty! That was fun!
If you try the cookie decorating remember icing consistency is key so if you have any questions, please ask in the comments and I will try to help you through.
Did I mention I also decorated their wedding cakes? Here’s a couple of pictures of those. My sister, Carol (Groom’s mom) baked the cakes and froze for me which saved a ton of time!


Decorating cookies is more fun and less stressful than cake decorating! I think it’s because if you mess up a cookie, you can just eat it and no one will know!
What a fun week in Alaska! Since this was our first trip to visit since we moved away 20 plus years ago, I got to play tourist for a few days. Then the cake decorating and rehearsal dinner prep began!
Congrats again to my handsome nephew and his beautiful new bride!
Have a Happy Easter!

Everything looks amazing!!! Nice work!!! I know it always feels a little ofd when working in someone else’s kitchen…doesn’t look like it bothered you at all! 😊
Congratulations Austin and Domi!
Thanks Ronna! Been enjoying your fresh garden salad pics! So jealous!!!