For years I decorated cakes which helped me pay for some of my college. In recent years, I find I don’t decorate cakes as much. This little fact may even be a surprise to many of my friends. However, my new found love is decorating cookies. They are so much more fun and WAY less pressure. If you mess one up, there are usually about a dozen more to perfect. Can’t say that for a cake!
I recently decorated some simple pumpkin cookies and thought I would share the process along with some techniques and tips in case you wish to give it a try.

Cut Out Sugar Cookies
Makes about 18-24 cookies depending on size of cookie cutter.
Ingredients
- 1 cup butter (cold) cut into small cubes
- 1 cup sugar
- 1 egg
- 1 1/2 tsp vanilla or flavoring of your choice
- 3 cups flour
- 2 tsp baking powder
Instructions
-
Preheat oven to 350 degrees. In a mixer, beat butter and sugar. Add egg and vanilla and beat until well combined. Combine flour and baking powder in separate bowl and add it to the mixer a little at a time until well combined.
-
On parchment paper, sprinkle some flour and roll out dough until about 1/4 inch thick or maybe a little thicker. Place shapes on parchment covered cookie sheet. Freeze for about 5-10 minutes.
-
While first batch is in freezer, cut the shapes for second batch and place on a second cookie sheet.
-
Remove first sheet pan from freezer and bake for about 10-12 minutes. Place second batch in freezer while first batch is baking.
-
Once cookies are baked, allow to cool before decorating.
Tips:
Freezing the cookies before baking helps them keep their shape so they do not spread while baking. So I wouldn’t advise skipping this step!
Cookies should be grouped by size when baking. Larger cookies take longer to bake so your smaller cookies will be overdone if on same cookie sheet.

Royal Icing
Recipe can decorated about 48 cookies in several colors depending on cookie size and number of colors needed. Recipe can be halved for smaller batches.
Ingredients
- 1/2 cup meringue powder
- 1 cup water
- 2 lb powder sugar
- 1 Tbsp Karo syrup
- 1-2 tsp flavoring of your choice optional
Instructions
-
In a mixing bowl with whip attachment, mix meringue powder, water and flavoring until frothy. On low, gradually add powdered sugar until well mixed, be sure to scrap down bowl. Add syrup and beat on high for about three minutes.
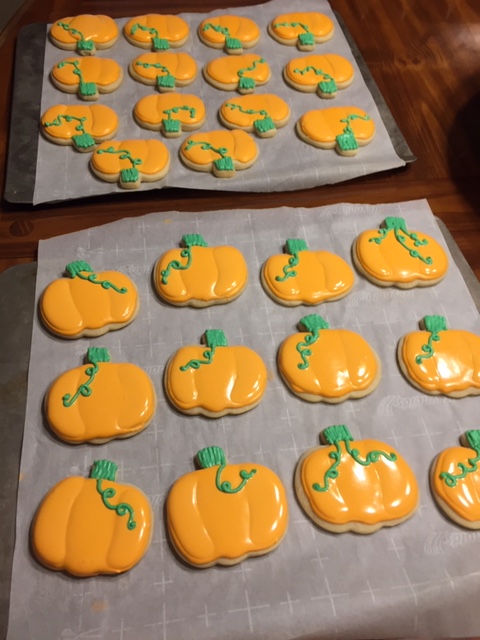
While the cookies are cooling, make a batch of icing and portion it for two colors. The orange will be used the most so make the larger portion orange. I would reserve about 1 1/2 cups for the green. The orange icing will need to be thinned out using about a tablespoon or two of water at a time to get it to correct consistency. For proper consistency, you should be able to drizzle the icing from a spoon back into the bowl of icing and it disappears into itself within about five seconds. Once you have your icing at the correct consistency, allow it to sit a few minutes so bubbles can settle out.

For decorating, you can use decorating bags and tips, but I prefer these squeezable bottles. They are just easier in my opinion because for this thinned icing (used for “flooding” the cookie), it will leak from the piping bag when not in use and it gets messy. Trust me on that! Fill your weapon of choice up with icing and get started! The first step is to make the above outline of the pumpkin. (FYI, in case you are wondering why my cookies are speckled, I used vanilla bean paste for my cookie flavoring which is why you see the small specs of vanilla bean seeds.)

Next, completely fill (flood) the middle section of the pumpkin and be sure to puncture any bubbles with a toothpick or a cookie scriber. Once you outline and flood the middle section, move on and do the rest of the cookies up to this point. You want this step to dry for at least 15 minutes before you move on to filling the outside sections of the pumpkin.

Next, flood the outside sections of the pumpkin. The dry time allows the sections to stay separated and creates the lines in the pumpkins. You do not want the sections to “run” together.

The cookies should be allowed to dry for an hour or so before you add the green stem and vines. I used a #3 tip for this and a piping bag. The green icing does not need to be thinned since it’s used for piping and not flooding. I prefer the textured look for the stem and the vines as you see above. Only thin icing for the “flooding” parts of your cookie.
Allow the cookies to dry overnight. They are now ready to enjoy. You can wrap cookies individually to give away or they freeze very well in a plastic container. I make most of my decorated cookies weeks in advance and freeze using the parchment paper from the baking process between each layer of cookies so they don’t sit directly on top of each other. (Yes, I am always trying to re-purpose what I can!)
As always, if you try these, let me know how they work out for you. Also, if you have any questions ask away in comments.

Reader Comments